
In this article:
- Step 1: Enable Canvas Permissions
- Step 2: Access LMS Connections in Poll Everywhere
- Option 1: Register Poll Everywhere in Canvas (Dynamic Registration via Developer Keys)
- Option 2: Install globally by Client ID (optional)
- Step 3: Verify Installation
- Limit Availability to a Subaccount (Optional)
- Next Steps for Faculty
This guide is for Canvas system administrators and explains how to integrate Poll Everywhere 2.0 into Canvas using LTI 1.3 and LTI Advantage.
LTI Advantage (Learning Tools Interoperability 1.3) is the latest IMS Global Learning Consortium enabling secure, seamless data exchange between systems. Poll Everywhere 2.0 provides:
- Automatic roster synchronization
- Activity and assignment management
- Smooth grade and data syncing
Before setup, ensure:
- Canvas Admin access
- Admin or Owner role in your institution’s Poll Everywhere account
- Poll Everywhere 2.0 account with LTI Advantage enabled
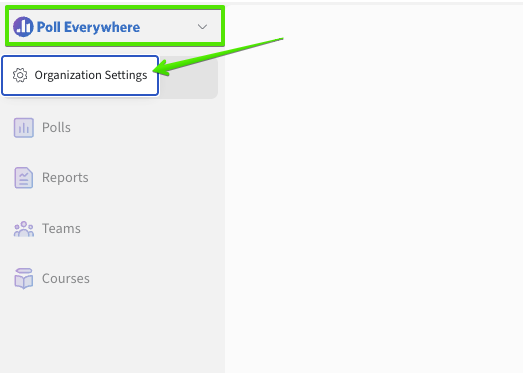
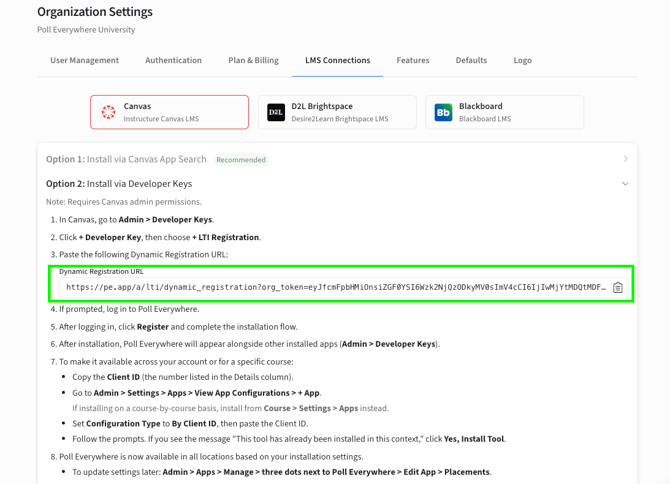
- Access to the Dynamic Registration URL (found under Org Settings → LMS Connections in Poll Everywhere)
Step 1: Enable Canvas Permissions
- Ensure the Canvas Admin performing setup has both Canvas and Poll Everywhere Admin permissions.
- Instructors using LTI Advantage must have:
- Be an instructor in Canvas
- A Poll Everywhere account with the Presenter role
Step 2: Access LMS Connections in Poll Everywhere
- Log in to Poll Everywhere as an Admin.
- Navigate to Org Settings → LMS Connections.
- Copy the Dynamic Registration URL.
Option 1: Register Poll Everywhere in Canvas (Dynamic Registration via Developer Keys)
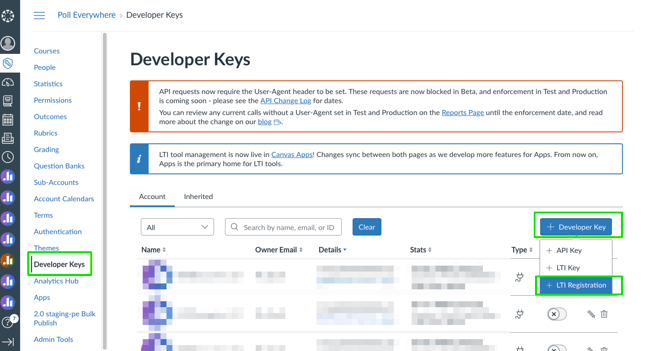
- Log in to Canvas as an Admin.
- Go to Admin → Developer Keys → + Developer Key → + LTI Registration then paste the Dynamic Registration URL
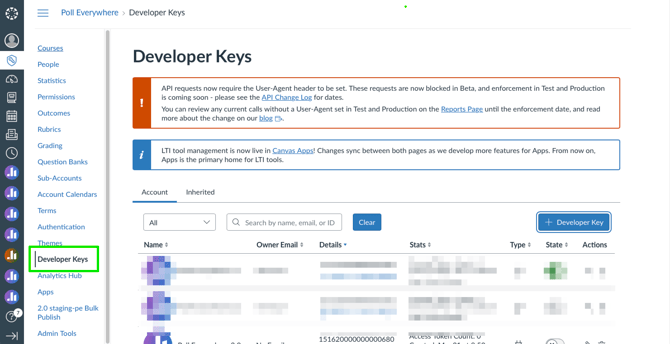
3. You will now see a pop-up window overlaying the Developer Keys page, and paste the Poll Everywhere Dynamic Registration URL provided from the LMS Connections.
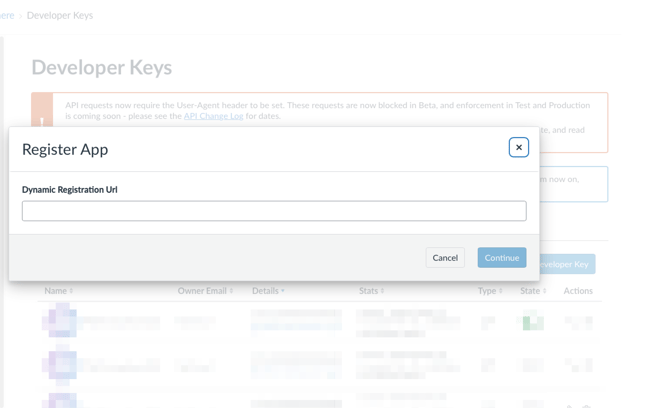
4. Click Next, review permissions, and register.
- Leave permissions as-is (all user data + course navigation required).
- Course Navigation is essential for the integration to function. Other permissions on "placements" are optional but recommended for richer functionality.
- Name the app (e.g., “Poll Everywhere 2.0”), and other administrative details as needed.
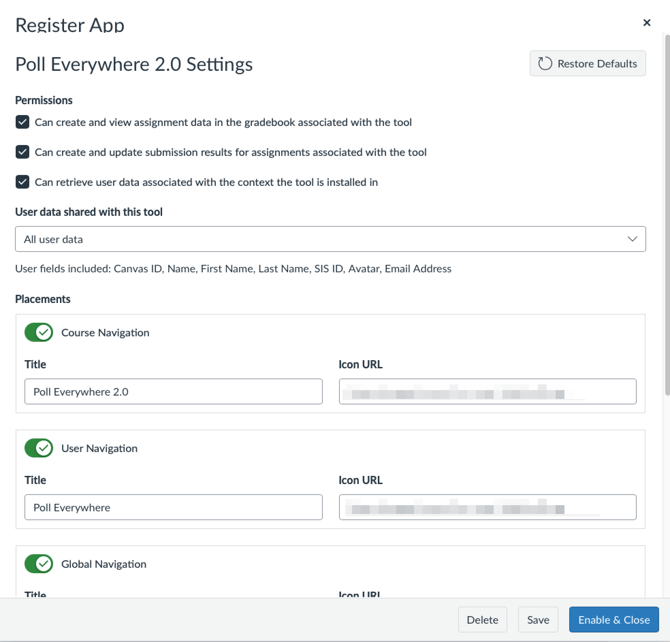
Note: Each time this flow is completed, a new Client ID is created in Canvas, and a new registration appears in Poll Everywhere. Complete the Dynamic Registration flow in one uninterrupted session. Do not refresh the page or navigate back during setup doing so will trigger a new registration and may create duplicate Client IDs, which can cause unpredictable launch behavior and errors.
Option 2: Install globally by Client ID (optional)
Helpful tip: You can install Poll Everywhere in Canvas globally (for all courses) or within a single course, depending on your use case.
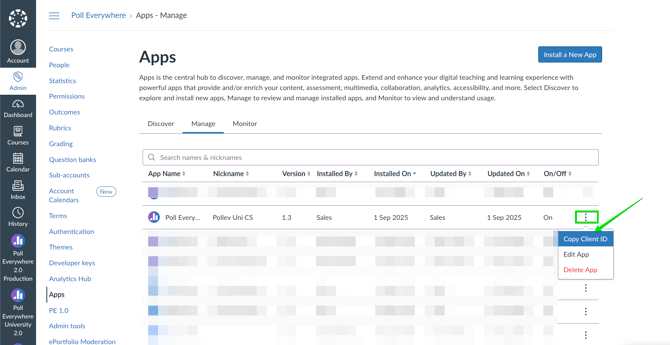
- In Canvas, go to Admin → Apps → Manage → Connected App, and click on the Ellipsis, and "Copy Client ID"
- Navigate to Admin → Settings → Apps → View App Configurations → Add App.
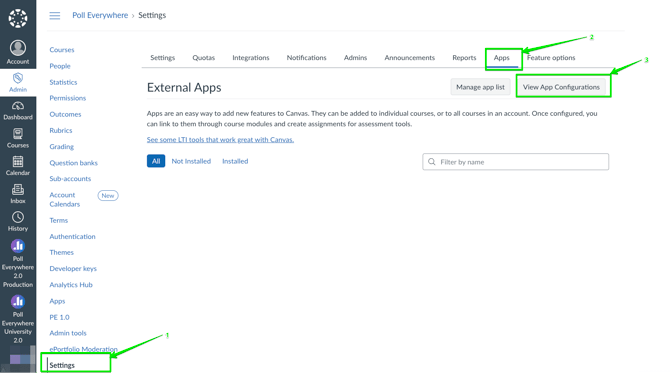
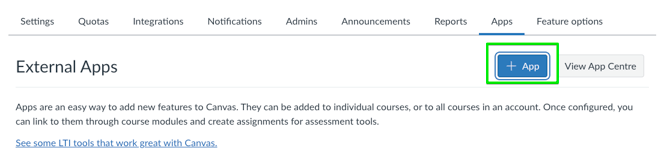
- You will now see a pop-up window overlaying the External Apps page. Choose By Client ID as the configuration type in the drop-down menu, and then paste the copied Client ID
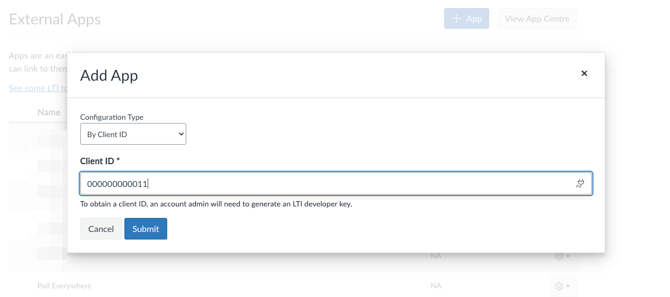
- Submit and install
Step 3: Verify Installation
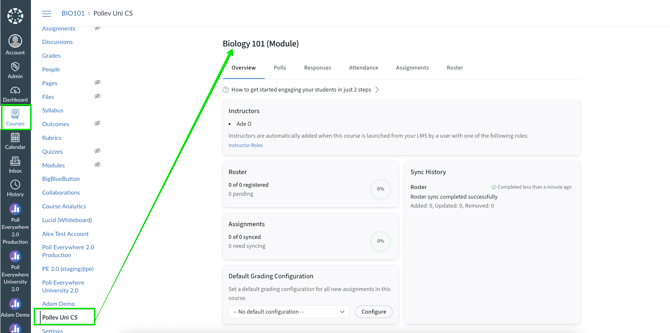
- Navigate to any Canvas course.
- Check that Poll Everywhere appears in the course navigation.
- If it does not, verify Client ID configuration.
- Note: Links will only appear after the first launch.
Limit Availability to a Subaccount (Optional)
If your institution is not ready for a full rollout and wants to restrict PE 2.0 to a specific Subaccount (e.g., a Testing Subaccount) rather than deploying institution-wide:
- After completing Steps 2 and 3, navigate to Admin → Apps → Manage Apps and locate Poll Everywhere 2.0.
- Open the Availability and Exceptions tab.
- Set the root account status to Off (not "Not Available").
- Click Add Exception and select your target Subaccount (e.g., "Testing").
- Set the exception to Available, and Save.
Expected configuration: Root = Not Available | Subaccount Exception = Available
This is the intended Canvas behavior for scoping LTI tools to specific subaccounts. Canvas inherits exceptions downward; any new courses created within the excepted subaccount will automatically inherit access.
Why do I see two entries in the Exceptions tab? There are two distinct causes; identify which applies to you:
- Cause A: Pre-existing subaccount or course deployment. If Poll Everywhere 2.0 was already deployed directly to specific subaccounts or courses before root-level management was configured, Canvas displays both the existing deployment and the root deployment separately. Root-level management is not yet supported when course-level deployments already exist. Workaround: Reinstall the tool at the root account using the legacy By Client ID method (see Option 2 above). After installation, set the root to Not Available and re-add your subaccount exceptions. The original subaccount/course-level deployment will then be superseded.
- Cause B: Multiple placements from Dynamic Registration. If you registered via Dynamic Registration, Canvas registers each placement (e.g., Course Navigation, Deep Linking) as a separate entry. Both entries appearing in the Exceptions tab is expected behaviour, this is not a duplicate registration. Apply your availability settings consistently to both entries to ensure uniform behaviour across the integration.
Relevant Canvas Resources for Admins:
- How do I manage LTI tools in a sub-account? (Canvas Community Admin Guide)
- How do I manage app availability and exceptions in Canvas Apps? (Canvas Community Admin Guide)
- How do I configure an external app for a course using a Client ID? (Canvas Community Instructor Guide)
- How do I create a sub-account? (Canvas Community Admin Guide)
- How do I configure the settings for an LTI key? (Canvas Community Admin Guide (covers availability and exceptions))
Note: Canvas Community article links can change with platform updates.
Next Steps for Faculty
Admins should direct instructors to the [Canvas LTI Advantage Usage Guide for Educators] for steps on:
- Syncing rosters
- Creating assignments
- Managing responses and grades
If you have any questions or run into issues, please contact the Technical Support team